Skip Navigation Download Acrobat Reader 5.0 or higher to view PDF files.
FDIC-Insured - Backed by the full faith and credit of the U.S. Government

FAQ


Your regular bank transactions will show in Online Banking the same day they are posted to your account.
No. However, if the Bank account is a joint account it is acceptable for all account holders to have access to these accounts via their own individual Online Banking.
You can create your own self-password reset question and will also be prompted to do so upon initial login. Select the Options tab; under personal you can enter your secret question and answer. If you forget your password, on the home login screen you then can click “Forgot Password” and you will receive an email to reset your password. Or you can call our Customer Service Department and ask them to reset your PIN at 406.728.3115.

Maybe your kid needs a little help with their car payment this month or you owe your friend from when they covered your share of the brunch bill last weekend. Whatever the reason, we have a simple, quick way to move funds directly from your account to theirs. 

From within online banking, access the bill pay tab. Click “Pay a Person”, then select the direct deposit option. 
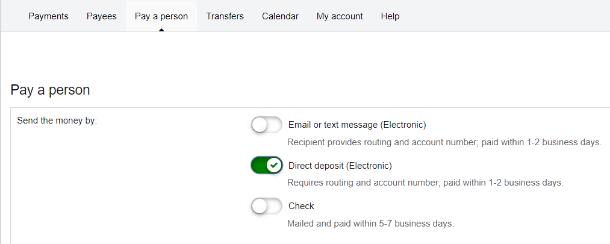
bill pay screen shot

The next screen will prompt you to input information for the individual being paid: their name, phone number, account number, and routing number. You’ll need to activate the new payee, then you’ll be able to select to pay them from the main “Bill Payee” screen. 

  bill pay screenshot

From there, click the payee, select pay, and input the amount and date.

bill pay screen shot

bill pay screen shot

When you confirm the payment, you’ll have an opportunity to review the details.

Does it all look right? Great! Click submit and your payment is on its way. Congrats, you just saved yourself a stamp!


Yes. Online Banking Business provides administrative functionality that allows the designated account administrator to grant access to additional users. There is no limit on the number of users that can access your online account.
Yes. The account administrator has the authority to restrict the capabilities of any user. With this authority, dual control can be accommodated for all functions.


Payments must be initiated 2-3 business days prior to payment due date for electronic delivery. Payments must be initiated 7-10 business days prior to payment due date for paper check delivery.

For electronic transactions, the money will be withdrawn from your account on the processing date you have set. For transactions processed by check, the money will be withdrawn from your account when the check is presented for payment by the payee. Your account will never be debited before the processing date you have set.
When scheduling a one-time or recurring payment that may fall on a weekend or holiday, you can choose to process the payment the business day before or after the payment date.  Any payments that are scheduled over the weekend (Sat-Sun), for the current weekend, will be processed on Monday.  Holiday processing is done the next business day.
Yes. You may schedule both one-time and recurring payments.
You may add, edit or delete payments anytime before they are processed. Transactions that need to be processed on the current day need to be entered before 1:00PM MST.
Stop payments may be placed on check payments, but not electronic payments. Contact our Customer Service Department at 406-728-3115 or you can add the stop payment on a check payment via your online banking account.
Yes, as long as you have a checking account with our bank.
No. You will have to set up a new payee with the correct address and delete the old one.

Yes. You can pay a person with either an email address, mobile phone number or by providing their routing number and account number. If an email is used, the payee may select to receive payment via their checking/savings account or their debit card.

When using Person to Person Payment there is a $2,500 limit per transaction or day.
Under the Bill Pay tab, select My Account. Then select Add Account which is located under Pay from Accounts. You will be asked to enter the nickname for the account being added, the account number and account type. After selecting Submit, you will be allowed to review the submission for accuracy.


The Mobile App is available for iOS and Android compatible devices.
Since your account data is not stored on your mobile device, your information cannot be stolen. When you replace your device, simply download the app and make any changes to the Wireless Provider and/or Phone Number.
If you have selected to receive text alerts, each time you make a transfer or bill payment, a confirmation SMS Text Message will be sent to your mobile device. If you do not receive a confirmation text message, double check to make sure the transaction went through via Online Banking.
If you do not receive the above message due to a dropped call or lost signal, check your accounts and re-submit any transactions that did not process.
If you get a new phone but keep the same phone number and provider, no changes on your part are necessary. If you switch providers and/or phone numbers, log in to your Online Banking account via the Internet and update your information on the Options > Mobile Settings page. You will not receive SMS Text Messages regarding Mobile Banking transactions if your phone number is not correct.
There are a number of reasons that you may experience trouble accessing the mobile banking app on your phone. To use the mobile app, your phone needs to meet the following minimum requirements:

  1.  Your mobile device must be web enabled and device security settings must allow access to the programs necessary to support the app
  2.  Your mobile network must allow secure SSL traffic. (You may need to contact your mobile provider to determine this.)
  3.  Device needs to operate with a current Operating System (OS).
Transaction history displays according to the display options selected in your Online Banking account through a browser. For accounts you must designate which accounts you want to see in the Mobile Banking App by selecting them within the Mobile Settings Tab in Online Banking. You can only access Online Banking through a browser.
  • Add Payees and payments.
  • Delete Scheduled Payments – from the Activity list select the payment and choose Delete or use the garbage can icon under the Payment Details. You will be able to add new Bill Payment payees and make payments
Check your phone’s settings to make sure you don’t have Alpha-only enabled on the keypad.
  • Launch the app, log in, and choose “Deposit”, tap the plus (+) sign. (If you are not enrolled for Remote Deposit you will need to complete the initial setup first.)
  • To endorse the check print as legibly as possible "Mobile Deposit Glacier Bank' and sign your name underneath. See example below.check endorsement example
  • Take a picture of the front of the check
    • Ensure the check is well lit.
    • Place check on a dark, non-reflective background
    •  Remove other objects from the frame
    •  The app or camera will auto focus the image. Move back a few inches if the image is blurry
    • Make sure all four corners of the check are captured. It’s ok to have space around the check
    • Position the camera directly above the check
    • Turn off the flash if you are still having trouble
  • Take a picture of the back of the check
  • Select the account in which the check should be deposited.
  • Enter the amount of the check and submit
  • Wait while your images are reviewed and uploaded
  • Receive confirmation that your deposit has been submitted
  • You can make mobile deposits 24 hours a day, including weekends and holidays.
  • The Cut-off time for Mobile Check Deposits is 6:00pm MST
That's it! You’ve sent your deposit through a secure connection to First Security Bank. You can review your Mobile Check Deposit deposits and see the images you’ve submitted on the app’s Review Screen.
Mobile Check Deposit automatically reviews the images to be sure the check is filled out completely and that all fields are legible. If there’s a problem with the images, after a few seconds, a pop-up message will alert you to re-take the photo and submit the image again.
Users are required to retain the original paper items in a secure place. We also recommend you write on the front of the check: "Mobile deposit on DATE” (where DATE is the full date you deposited the check by Mobile Check Deposit). Securely store the paper check until you see the deposit in Online/Mobile Banking or on your statement. After five (5) days and not more than two weeks destroy the check (e.g. shred).
The upload confirmation screen means your deposit has been received for processing. Once accepted by the Bank you will receive an email confirmation notice. You’ll also see your deposit in Online/Mobile Banking and on your statement once it’s been processed. Your mobile deposit will be processed following the same processes we follow for other check deposits.

You can review your Mobile Check Deposits and see the images you’ve submitted on the app’s Review Deposits Screen.
Deposits received by 6pm MST are processed that business day. Weekend or holiday deposits will be processed the next business day.

The funds you deposit will be made available on the same day you make the deposit under normal circumstances.
You can deposit up to $3,500 each day and up to $7,000 per calendar month using Mobile Check Deposit. Other limitations may apply.
On the make a deposit screen, tap the i, this will display the daily and monthly deposit limits.

If you are a current Online Banking customer, select the eStatements tab and follow the prompts to enroll. If you are not an Online Banking customer, Click here to complete the Online Banking enrollment form. After you receive your User ID & password, select the eStatements tab and follow the prompts to enroll.
You will receive your statement and notices via email and US Mail the first month after enrollment. After that, they will be delivered solely via email notification.
Customers receive notification via email that their statement or notice is ready for viewing. Simply click on the secured attachment in the email notification or log in to your Online Banking. Enter your Online Banking User ID/Password then click on the eStatements tab to view your list of statements available.
Access up to 18 months of eStatements for each account enrolled starting at the time of enrollment. It is your responsibility to retain your eStatements by printing the PDF attachment or by saving the PDF file to your hard drive or other storage medium.
Your eStatements can be retained by printing the PDF attachment or by saving the PDF file to a folder on your hard drive or other storage medium.
Yes, please contact your local branch or a Customer Service Representative at 406-728-3115.
Yes. You will have the ability to establish three additional recipients to receive your eStatements. Click on the eStatements Tab within Online Banking and select Additional Recipients. Complete the setup using their email address to establish log in information for eStatement access.
It is your responsibility to establish and maintain their ID, password and email address. If they forget their password, or become locked out, they must contact you to obtain access again.
To continue receiving the email notice of your latest eStatements, you will need to update your email address via Online Banking. Click on the Options tab to update this information. It is important to maintain a current email address.
You may also un-enroll accounts using the Sign Up/Changes option within the eStatements tab in your Online Banking.
or
Contact us through our Secure Message on Online Banking or call 406-728-3115
You will need the latest version of Adobe® Acrobat® Reader™. It is free software for viewing and printing electronic forms. You can download the latest version here.